So far, you’ve learned how to build your network foundation: creating Virtual Networks, dividing them into subnets, and using Route Tables to direct traffic.
In this lesson, you will learn how to make your networks more secure by blocking or allowing network traffic to and from Virtual Machines using Network Security Groups (NSGs).
What is a Network Security Group (NSG)?
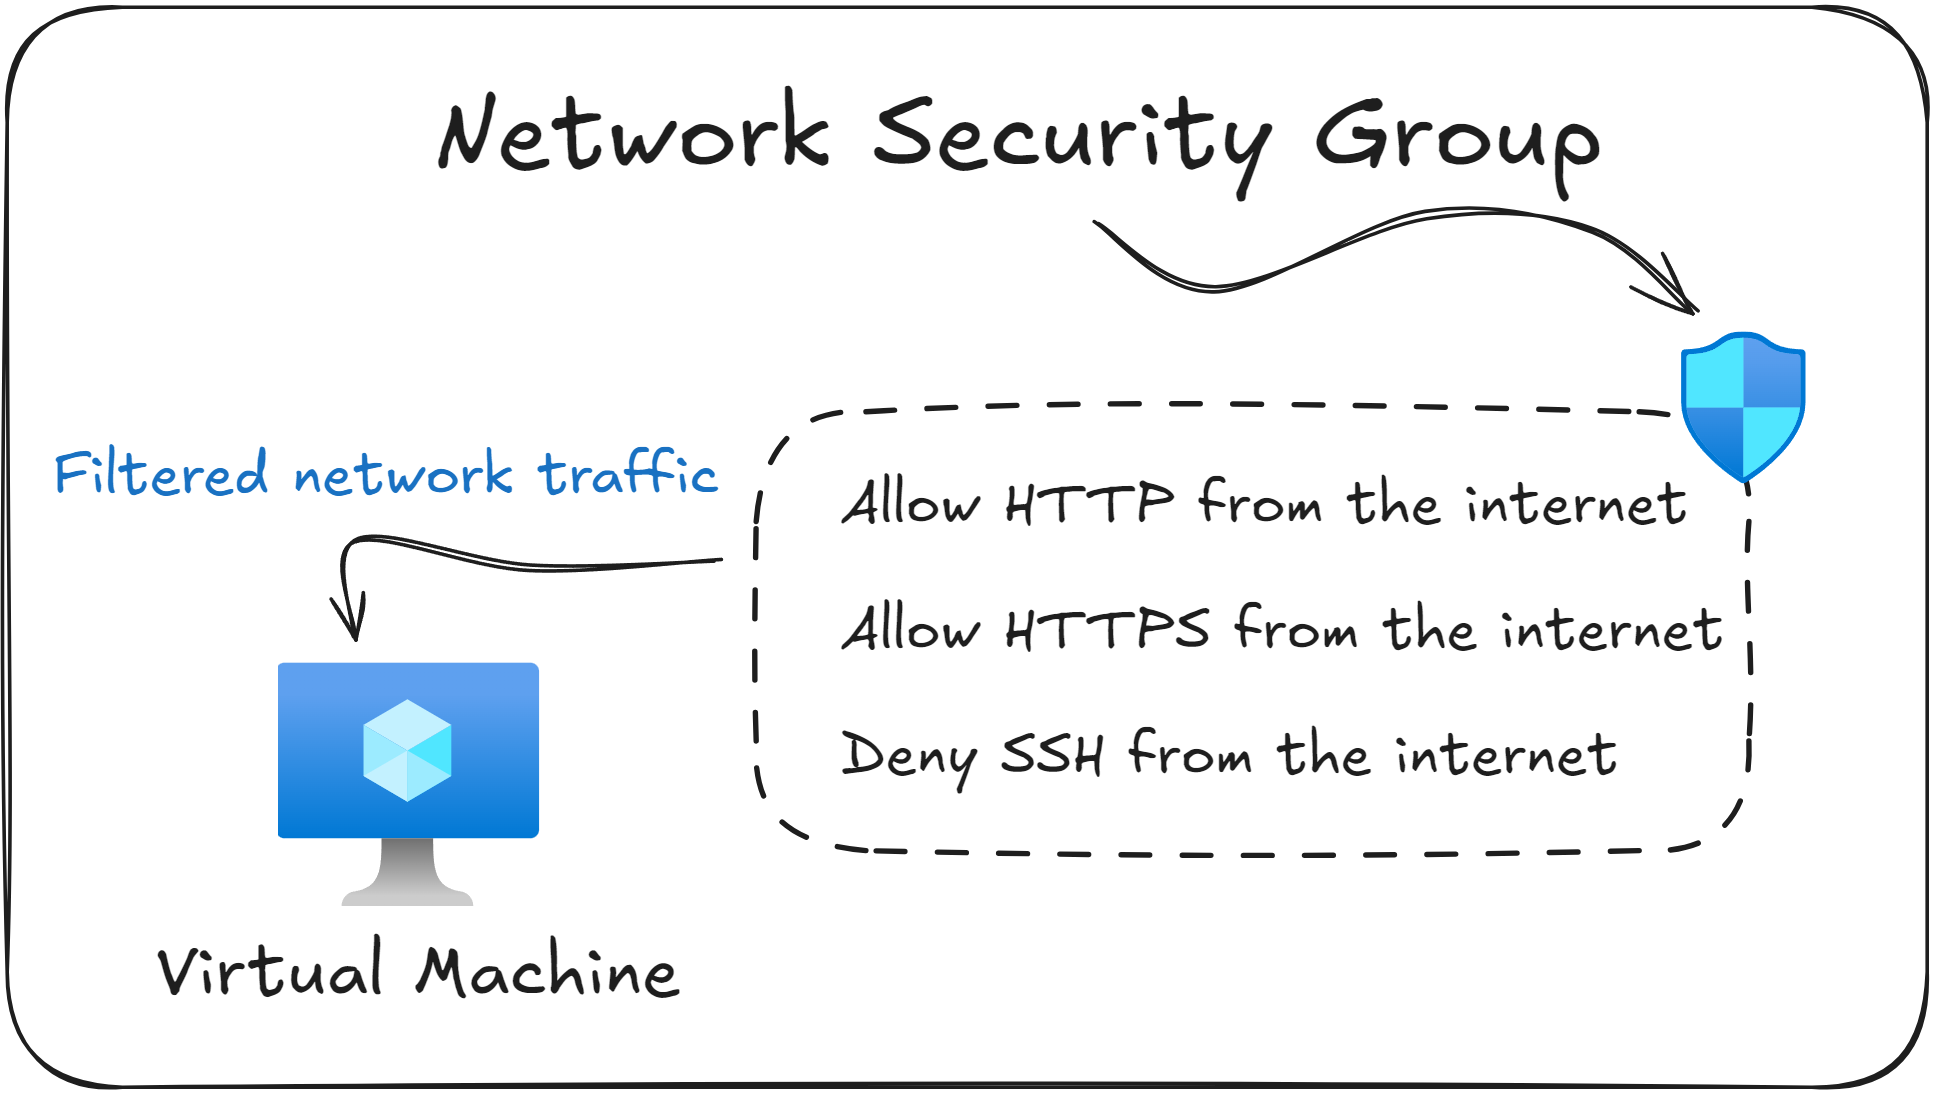
A Network Security Group (NSG) is Azure’s built in way of filtering network traffic.
It allows you to control which traffic is allowed and which traffic is blocked when VMs and other resources inside your Virtual Network try to communicate.
An NSG contains a list of security rules, where each rule specifies the source, destination, port, and protocol that should be allowed or blocked.
You can apply Network Security Groups on two levels:
At the subnet level, to apply the rules to all resources inside that subnet.
At the Virtual Machine level, by linking the NSG with the VM’s Network Interface Card (NIC).
As a practical example, suppose that you deploy a web server (VM) in Azure. By default it cannot be accessed from the internet. To fix that, you create an inbound NSG rule that allows traffic on port 80 (HTTP) and port 443 (HTTPS) from the internet to the VM.
The previous example shows a core idea behind Network Security Groups (NSGs): inbound traffic is blocked unless you manually add a rule to allow it.
During your exam, you will likely be asked why traffic to a certain Virtual Machine is blocked based on the existing Network Security Groups. Make sure to understand how to interpret the existing NSG Rules to identify the root cause.
Default Network Security Groups
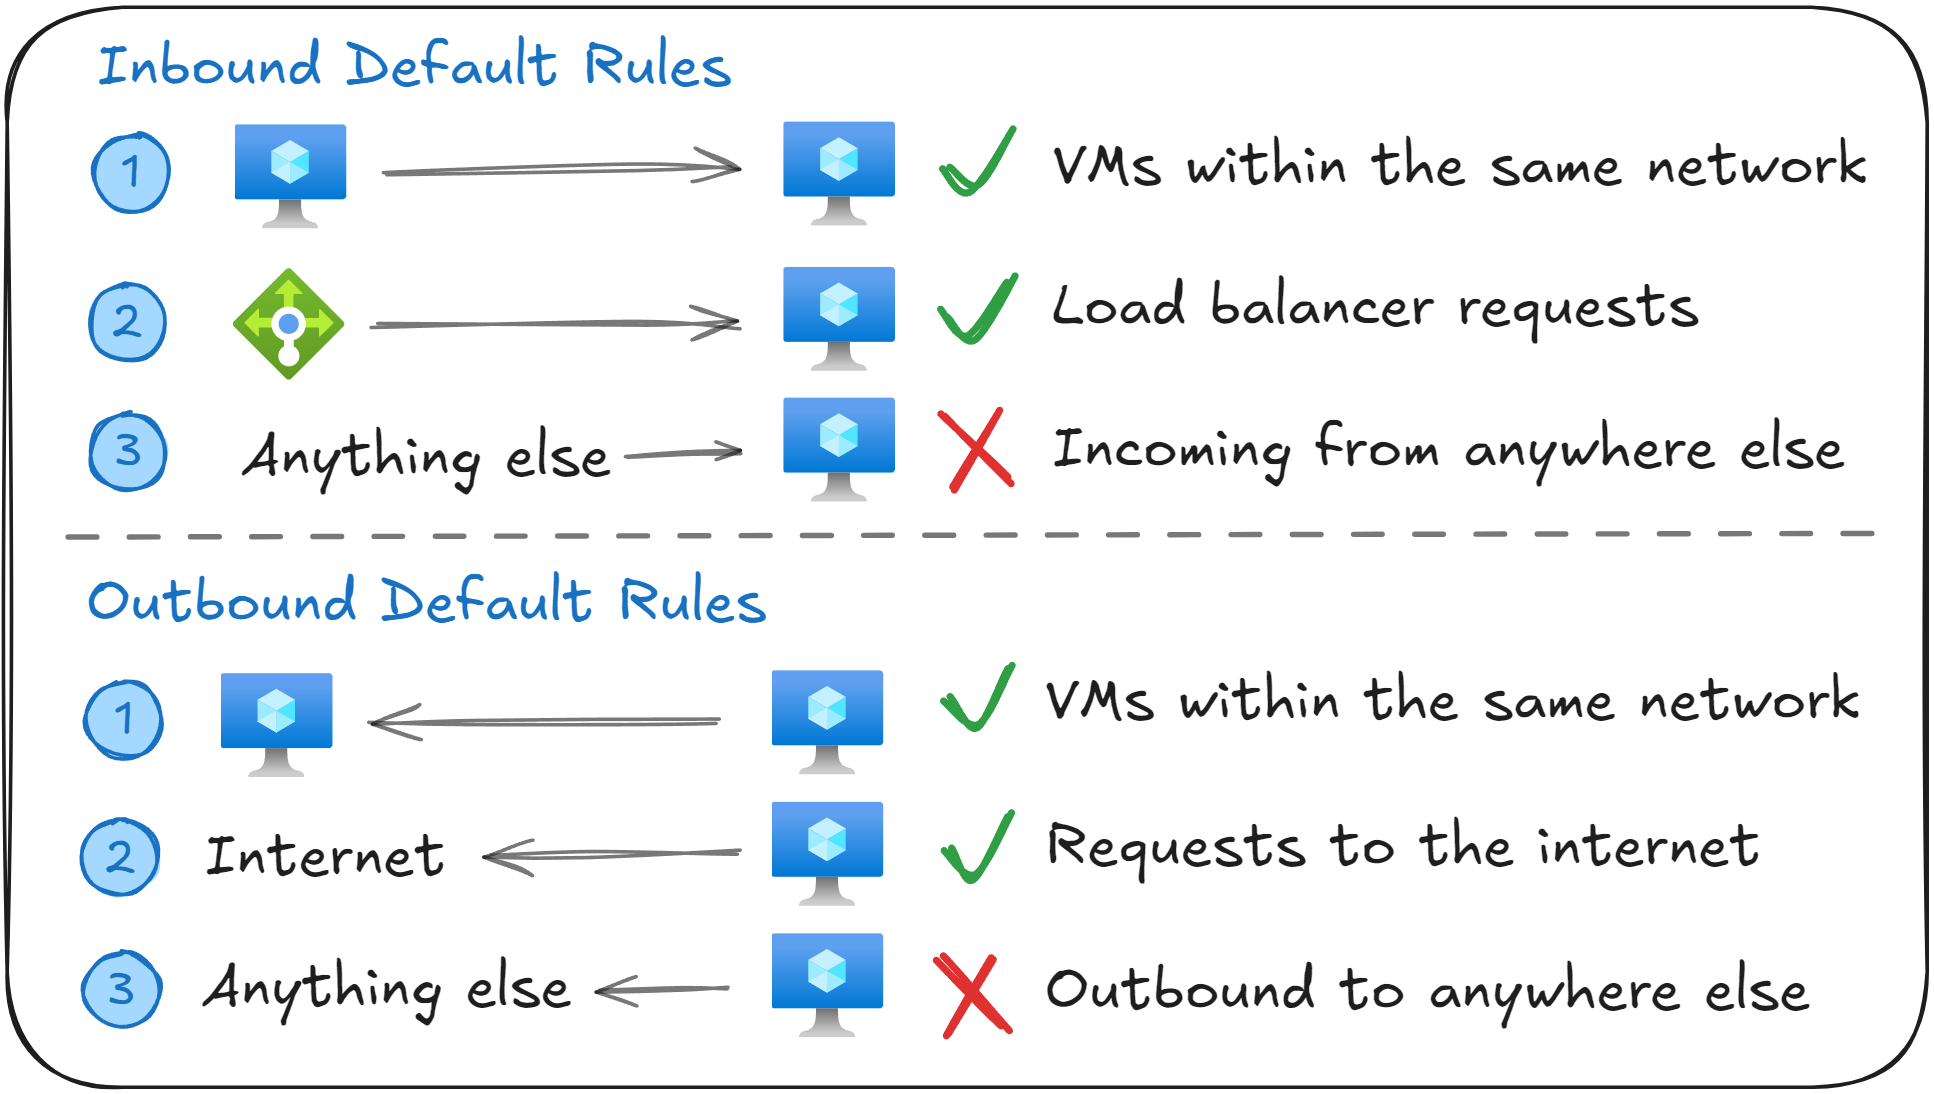
Every Network Security Groups (NSG) comes with six default rules: three inbound and three outbound. These rules provide basic network communication while keeping everything secure.
Inbound Security Rules
Name | Source | Destination | Access |
|---|---|---|---|
AllowVNetInBound | VirtualNetwork | VirtualNetwork | Allow |
AllowAzureLoadBalancerInBound | Azure Load Balancer | 0.0.0.0/0 | Allow |
DenyAllInBound | 0.0.0.0/0 | 0.0.0.0/0 | Deny |
The AllowVNetInBound rule allows inbound traffic between resources within the same Virtual Network (such as VM to VM communication).
The AllowAzureLoadBalancerInBound rule allows inbound traffic from Azure Load Balancer, including health probes. Without this rule, backend VMs would fail health checks and would be removed from the backend pool of the Load Balancer (more on how this works in the lesson about Azure Load Balancer).
The DenyAllInBound rule blocks all other inbound traffic. This means no traffic from the internet or external networks (such as on-premises networks) can reach your resources unless you explicitly allow it.
Outbound Security Rules
Name | Source | Destination | Access |
|---|---|---|---|
AllowVNetOutBound | VirtualNetwork | VirtualNetwork | Allow |
AllowInternetOutBound | 0.0.0.0/0 | Internet | Allow |
DenyAllOutBound | 0.0.0.0/0 | 0.0.0.0/0 | Deny |
The AllowVNetOutBound rule allows traffic from your VMs to other resources in the same Virtual Network (such as VM to VM communication).
The AllowInternetOutBound rule allows all outbound traffic to the internet. This allows VMs to download updates or access external services.
The DenyAllOutBound rule denies any other type of outbound traffic from leaving the subnet or VM. This is set up as a fallback in case all other rules weren’t a match.
Remember that you cannot delete or modify the default NSG Rules. In order to override them, you must create new rules with a lower priority number.
Associating Network Security Groups with Subnets or NICs
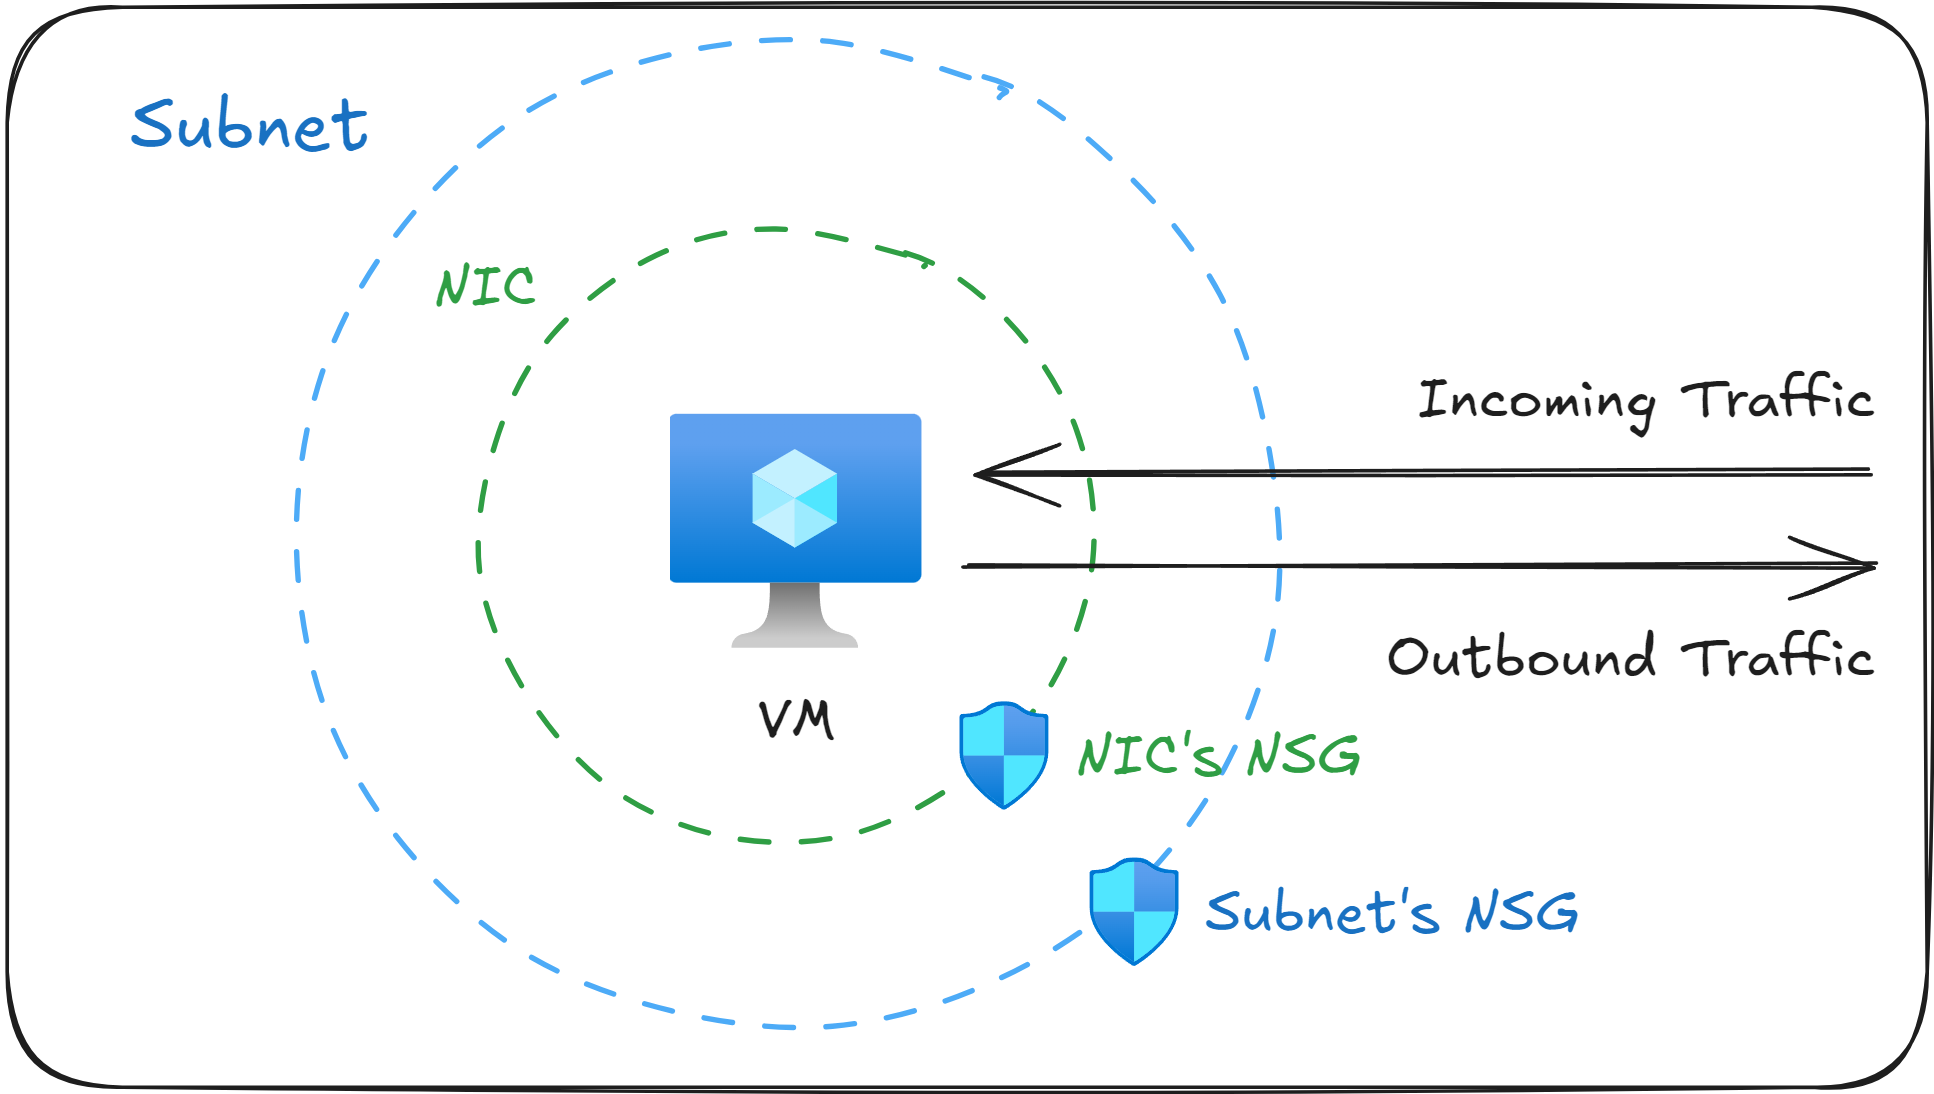
When you create a Network Security Group (NSG) in Azure, you can associate it at two different layers in your network:
At the subnet level, to control traffic for every VM inside that subnet.
At the Network Interface Card (NIC) level, to control traffic for that specific VM.
When both a subnet NSG and a NIC NSG are present, Azure will evaluate them in a specific order based on the direction in which the network traffic is going.
For inbound traffic → the subnet NSG will be evaluated first, then the NIC NSG.
For outbound traffic → the NIC NSG will be evaluated first, then the subnet NSG.
For network traffic to be able to pass through, both NSGs must allow it. If either NSG denies the traffic, the network packets will be dropped.
Exam questions often describe NSG rules that “aren’t working”. The common cause is that the NSG was associated at the wrong layer (subnet or NIC), or a rule at one layer is overriding the role on the other layer. Remember that traffic must be allowed on both layers for it go through.
In which order are rules evaluated?
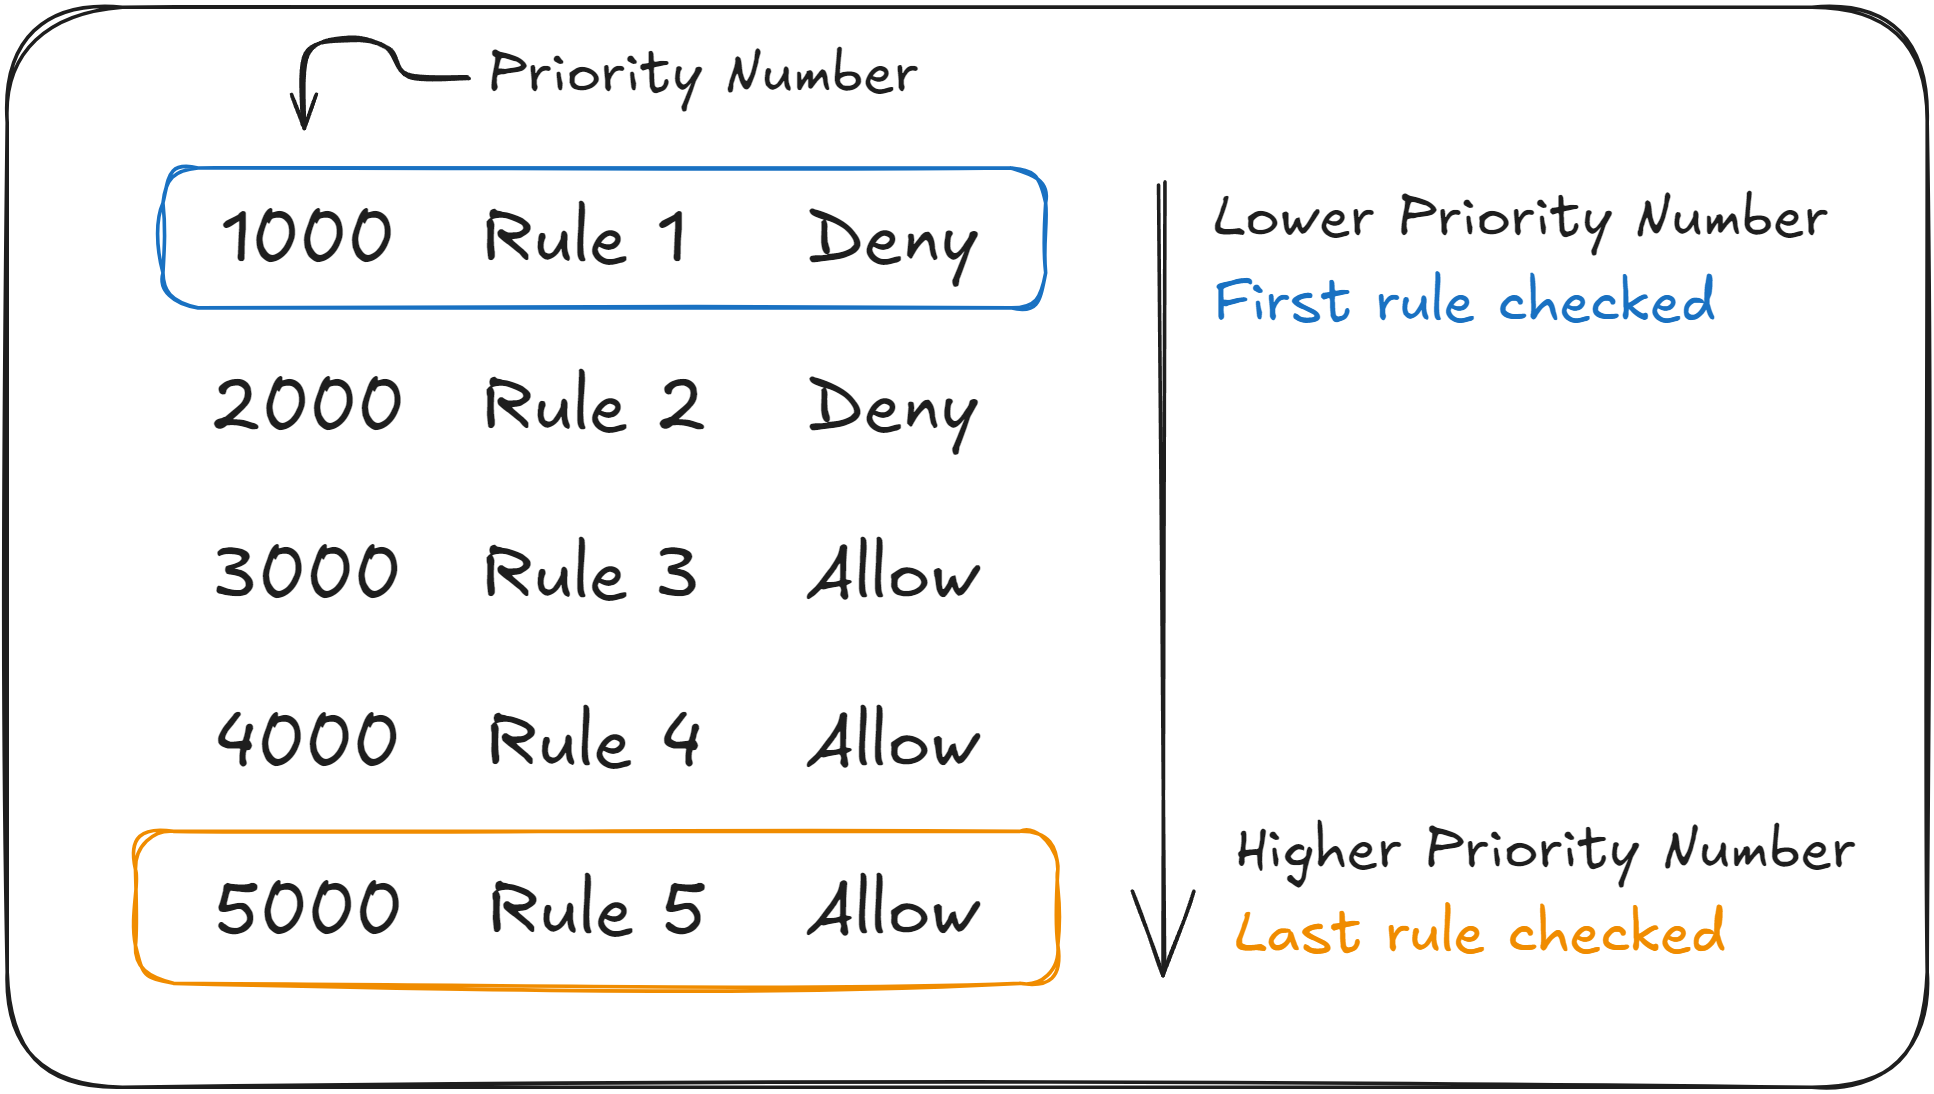
Every rule in a Network Security Group (NSG) has a Priority Number, which determines the order in which Azure evaluates them.
Azure evaluates NSG rules in ascending order. It starts with the rule that has the lowest priority number and goes through them one by one.
As soon as Azure finds a rule that matches the parameters of the current network traffic (source, destination, port, direction), it will either Allow or Deny the rule, and it will stop checking the remaining rules.
If you’re familiar with programming, here is a simple pseudocode algorithm showing you the steps Azure takes to evaluate NSG rules:
sort rules by priority (lowest → highest)

for each rule in rules:
    if traffic matches rule:
        apply rule.action   // Allow or Deny
        stop processing rules

// No later rules matter once a match is found
This means that a high-priority deny rule can override a lower priority allow rule, even if the allow rule is more specific.
It’s important to understand the order in which Azure evaluates NSG rules, as a subtle detail can make the difference between a correct and a wrong answer on your AZ-104 exam.
You will likely be asked why a Virtual Machine cannot access another resource in the Virtual Network, even though a NSG Rule seems to allow it. Always check the priority numbers. The allow rule must have a lower priority number than the deny rule that is blocking the traffic.
Real World Example: Securing a Two-Tier Web Application
Securing network communication between one or more web servers and a database is one of the most common patterns in real Azure environments, and it also appears in many AZ-104 questions.
Imagine you’ve just deployed the following resources:
Resource | Address Space | Purpose |
|---|---|---|
vnet-east-us-1 | 10.0.0.0/16 | Your main Virtual Network |
web-subnet | 10.0.1.0/24 | Hosts your web servers |
db-subnet | 10.0.2.0/24 | Hosts your database servers |
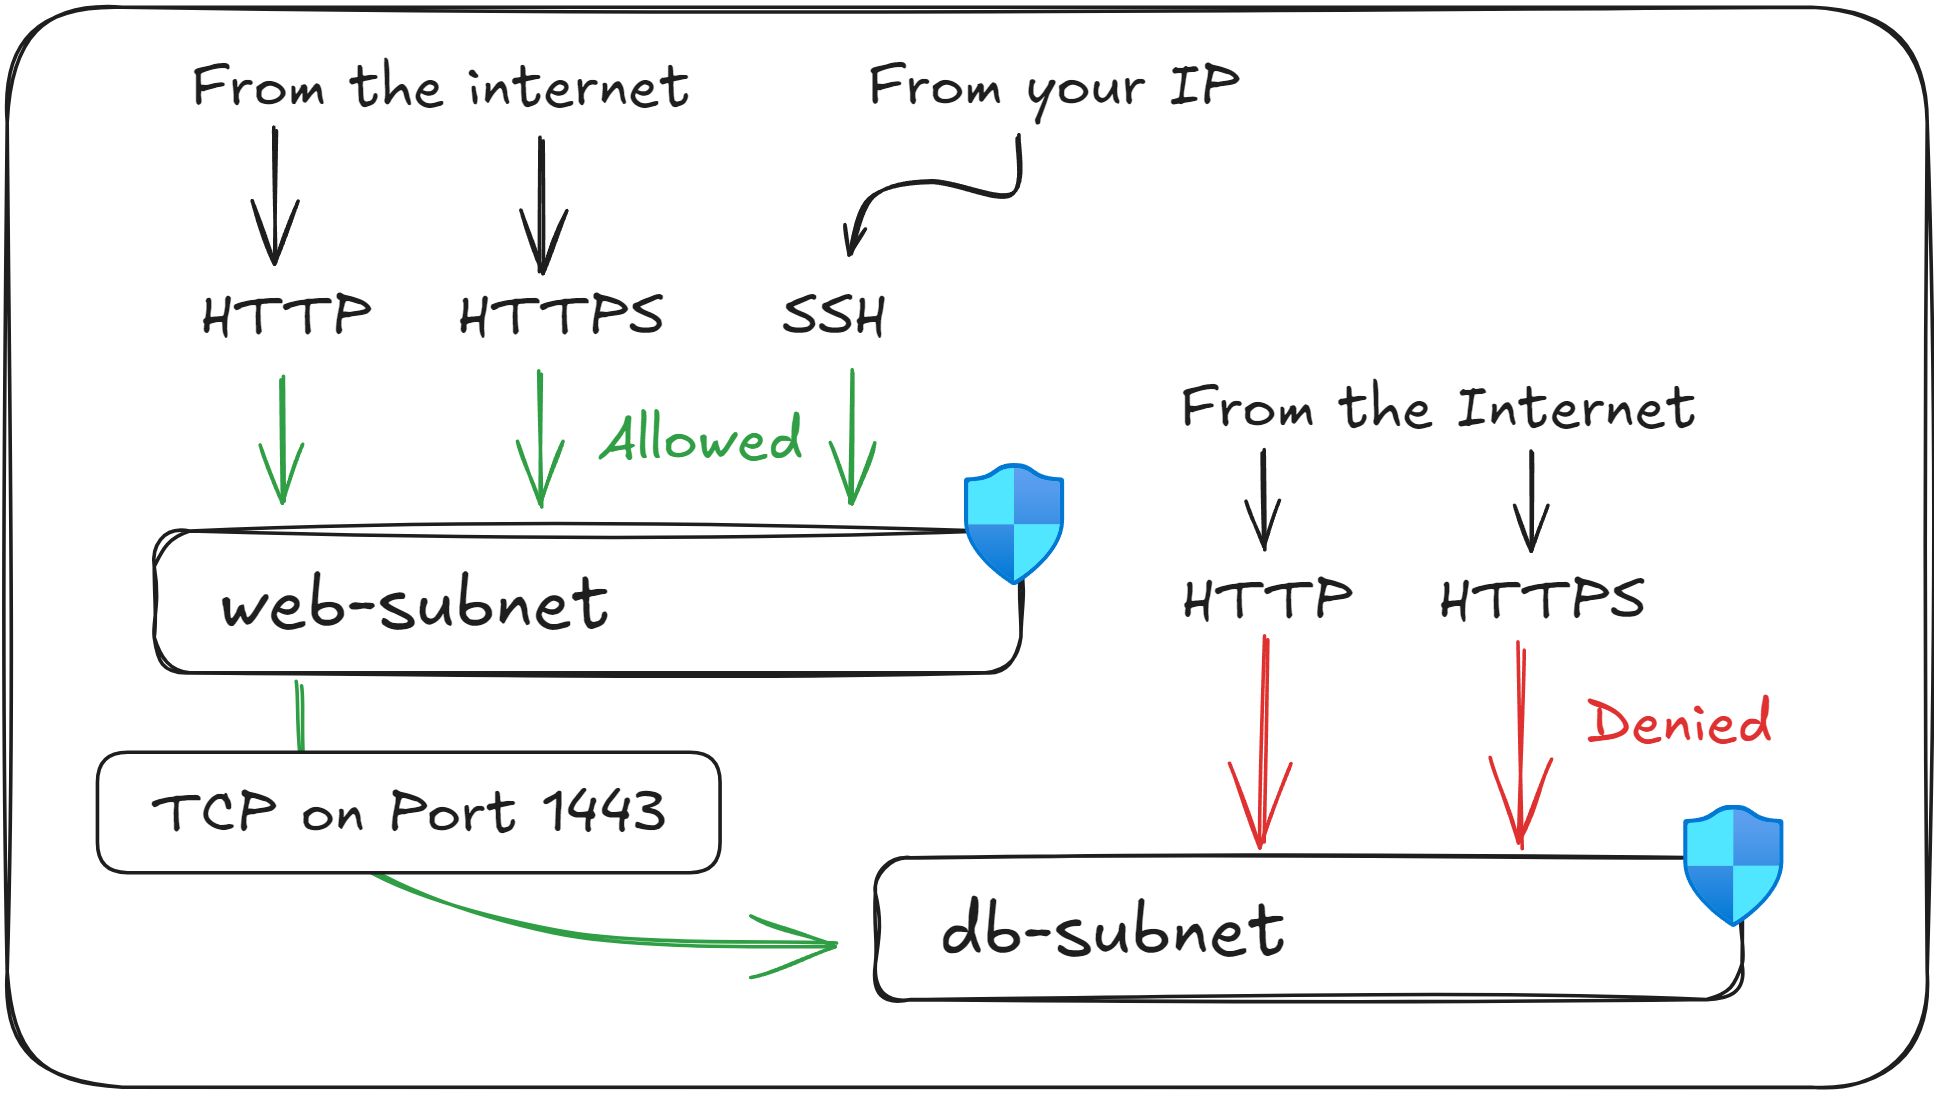
In this architecture, you need to allow public access to the web servers, while making sure that the database remains fully isolated from the internet.
The web servers act as the entry point of the application, so the web-subnet must allow inbound HTTP and HTTPS traffic.
You can also optionally allow SSH from your own Public IP address in order to manage the servers.
For the web-subnet you will need to apply the following NSG rules:
Rule Name | Ports | Protocol | Source | Access |
|---|---|---|---|---|
AllowHTTP | 80 | HTTP | Any | Allow |
AllowHTTPS | 443 | HTTPS | Any | Allow |
AllowSSH | 22 | SSH | (Your Public IP) | Allow |
Second, the database should be completely closed to the public internet. It should only accept network traffic originating from the web server, and only on the port used by the database (1433).
For the db-subnet, you will need to apply the following NSG rule:
Rule Name | Ports | Protocol | Source | Access |
|---|---|---|---|---|
AllowWebRequests | 1433 | TCP | 10.0.1.0/24 | Allow |
Once these rules are set in place, users from all over the world will be able to access the web server via HTTP/HTTPS, but only you will be able to SSH into it.
Also, any malicious user on the internet will not be able to reach your database directly, only your web servers can.
This setup will form the basis of a secure two-tier application in your Azure environment.
Remember common networking ports such as Port 22 for SSH (for Linux VMs), and 3389 for Remote Desktop Protocol (RDP, for Windows VMs), as you could be asked to enable access to them during the exam.
What to remember for your exam
Network Security Groups (NSGs) are used to restrict network traffic at the subnet or Network Interface Card (NIC) layer.
NSG rules are evaluated from the lowest number (highest priority) to the highest number (lowest priority).
Default NSG rules cannot be deleted or modified. To override them, you need to create new rules with a lower priority number.
Linux uses SSH on Port 22, and Windows uses RDP on Port 3389 for remote access.
Web servers commonly use port 80 (HTTP) and port 443 (HTTPS).
Always verify the priority of the NSG rules when troubleshooting network connectivity issues between Virtual Machines.
What’s next?
To lock in what you’ve learned, take the short 8-question quiz for this lesson. It will help you test your understanding of Network Security Groups (NSGs) before you move on.
In the next lesson, you'll learn how to dynamically apply NSG Rules to Virtual Machines through the use of Application Security Groups (ASGs).